

Photo by Aaron Burden on Unsplash
Turbocharge Your Website with CloudFront: Deep Dive into Internal Caching Mechanisms and S3 Implementation with Region Failover.


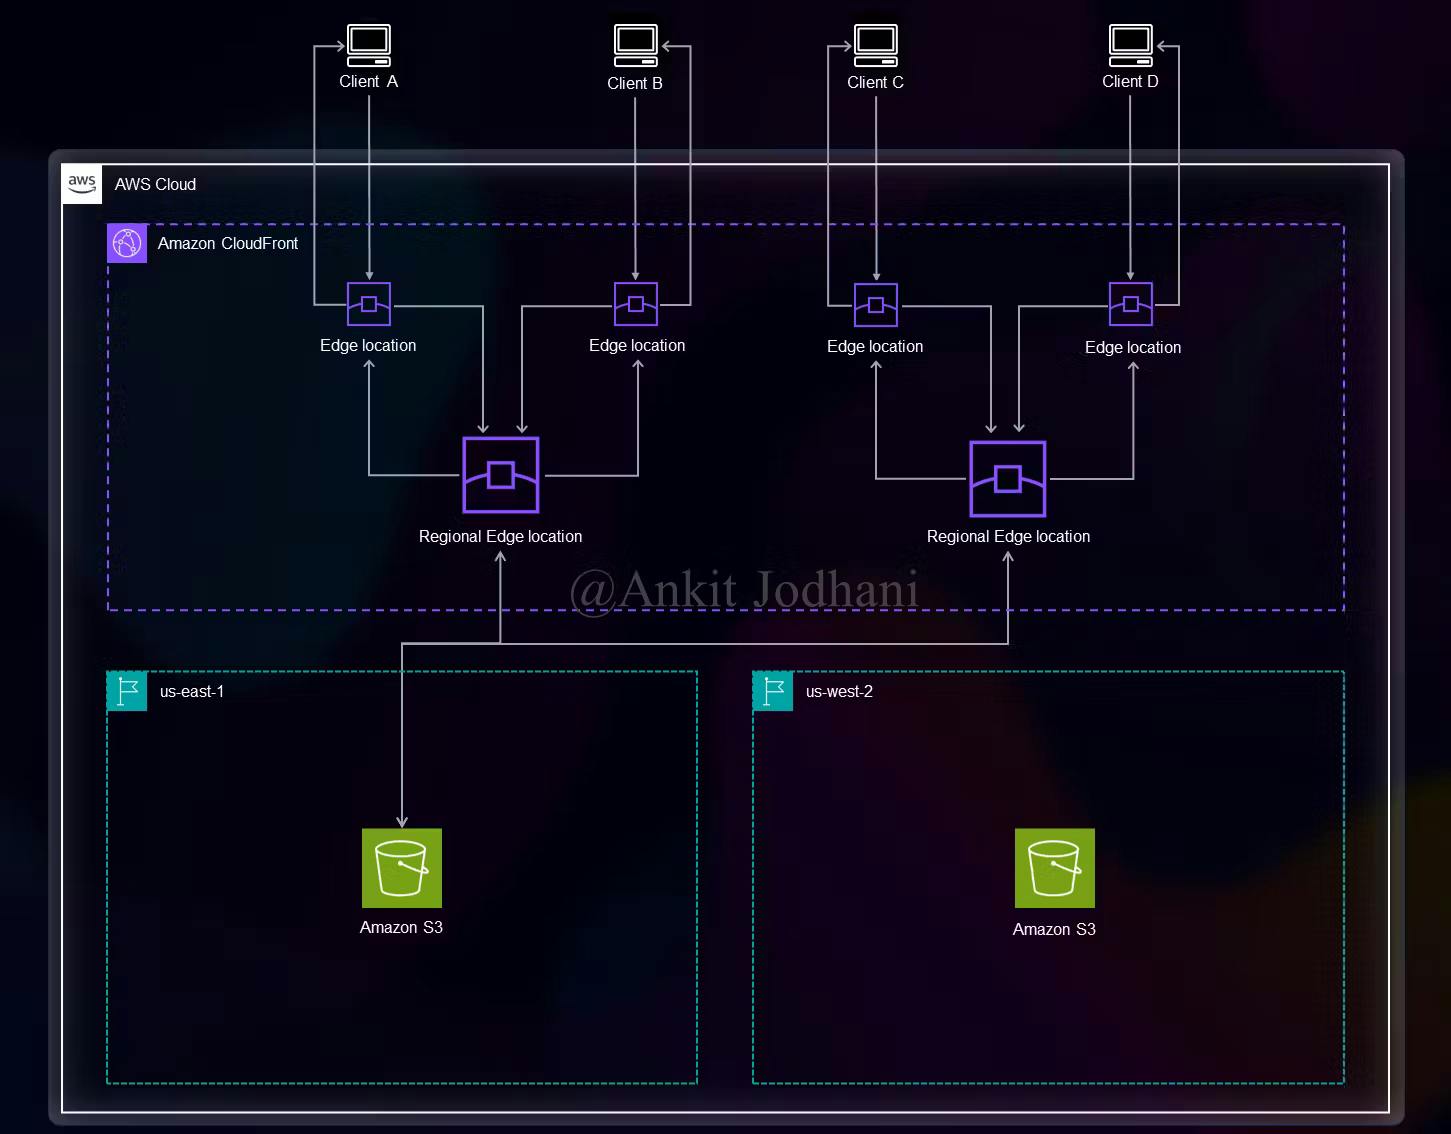
Table of Contents:
Overview of CloudFront
Internal Caching Mechanisms
Edge Caches
Origin Caches
TTL (Time-to-Live) and Cache Invalidation
Cache Behaviors
Implementing Websites on S3
Conclusion
Introduction:
CloudFront, Amazon Web Services' (AWS) content delivery network (CDN), plays a crucial role in improving the performance and availability of websites and applications globally. In this blog post, we will delve into the internal caching mechanisms of CloudFront and explore how to implement websites hosted on Amazon S3 with region failover. By understanding these concepts in-depth, you will be able to optimize your website's performance and ensure high availability for your users.
Overview of CloudFront: CloudFront is a globally distributed CDN that caches and delivers static and dynamic content from AWS edge locations. It reduces latency, improves transfer speeds, and lowers the load on origin servers. CloudFront integrates with various AWS services, including Amazon S3, EC2, and Lambda, to accelerate the delivery of content to end users worldwide.
Internal Caching Mechanisms:
Edge Caches: CloudFront uses edge caches located in AWS edge locations to store frequently accessed content closer to the end users. These edge caches are responsible for delivering content with low latency. When a request is made, CloudFront checks if the content is available in its edge cache. If it is, the cached content is served directly from the edge cache, avoiding the need to retrieve it from the origin server.
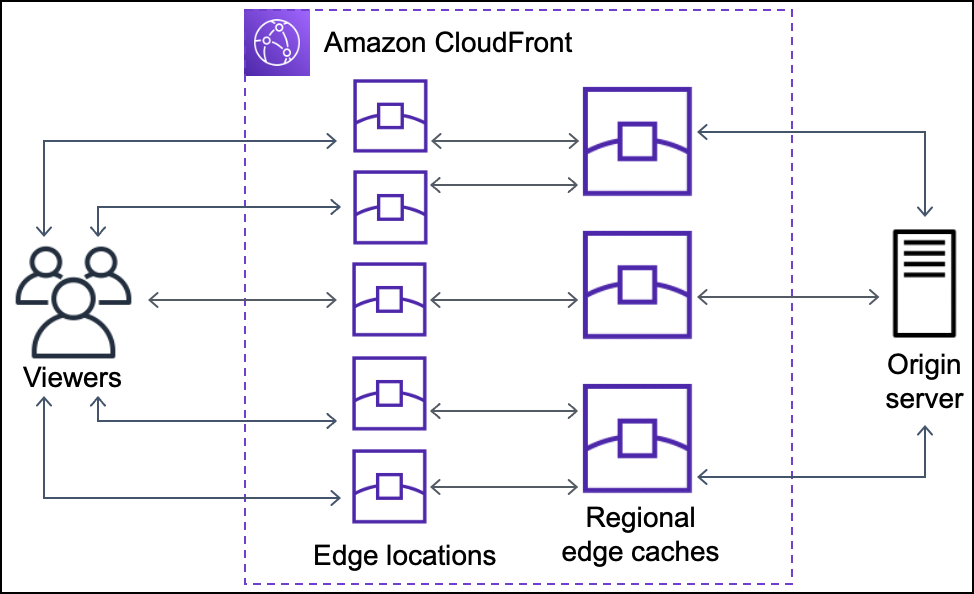
Origin Caches: CloudFront also employs origin caches, which are located close to the origin server, to reduce the load on the origin infrastructure. When content is not available in the edge cache or has expired, CloudFront retrieves it from the origin server and stores it in the origin cache. Subsequent requests for the same content are then served directly from the origin cache until the TTL (Time-to-Live) expires.
TTL (Time-to-Live) and Cache Invalidation: The TTL determines how long CloudFront keeps content in its caches. It can be configured based on the expected frequency of updates to the content. When an update is made to the origin content, CloudFront can be instructed to invalidate the cache for that particular content, ensuring that subsequent requests fetch the latest version from the origin server.

Cache Behaviors: Cache behaviors in CloudFront allow you to customize how content is cached and delivered based on specific URL patterns or request headers. By defining cache behaviors, you can control cache durations, cache keys, and the forwarding of specific headers to the origin server. This granular control enables efficient caching strategies and enhances performance for dynamic content.
Implementing Websites on S3:
Let's get our hands dirty with the implementation. we are going to utilize two regions. N.virginia (us-east-1) is the Primary and Oregon (us-west-2) is the Secondary region.
Log in to your AWS account and navigate to the AWS console. Type 'S3' in the search bar and open the S3 dashboard.

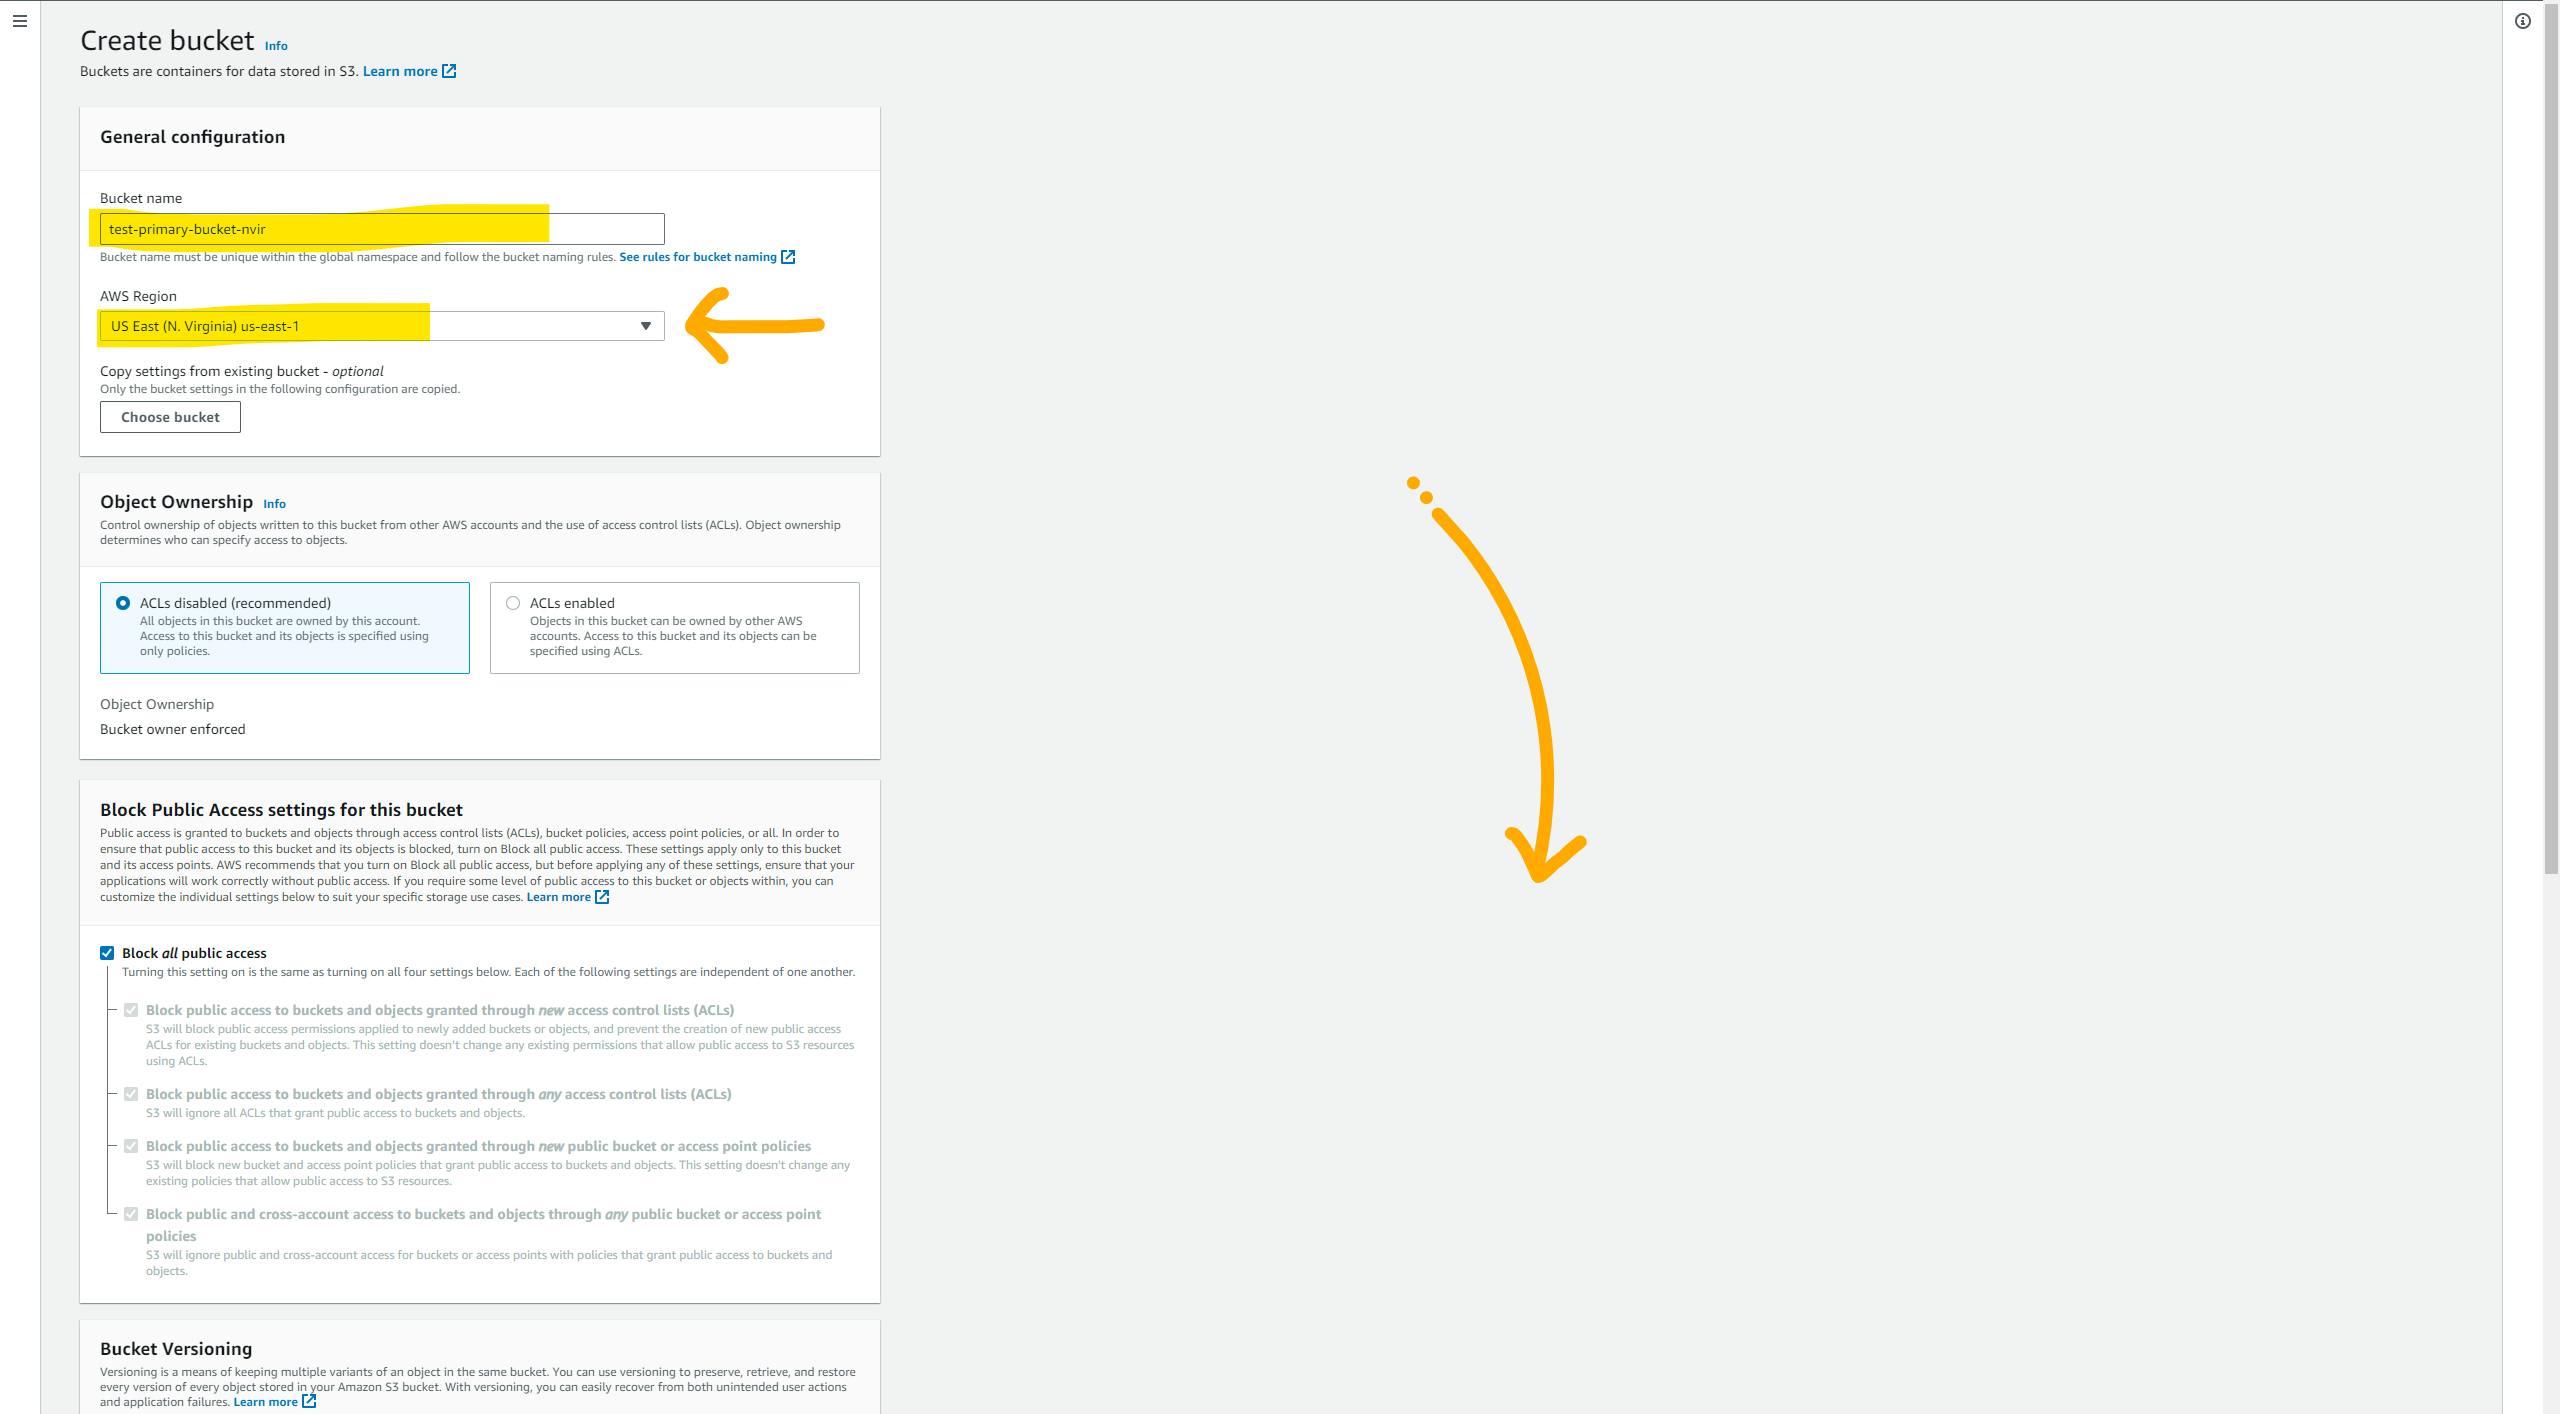
Click on the create bucket button in the top left corner.
Give a name to your bucket. Try to provide a relevant name such as 'website-primary-nvir' and select a region from the drop-down list. Scroll down and keep the rest of the settings as they are. Finally, click on the 'Create Bucket' button below.
Go inside the bucket and upload your static files(index.html, style.css, main.js etc.). and navigate to the 'properties' tab

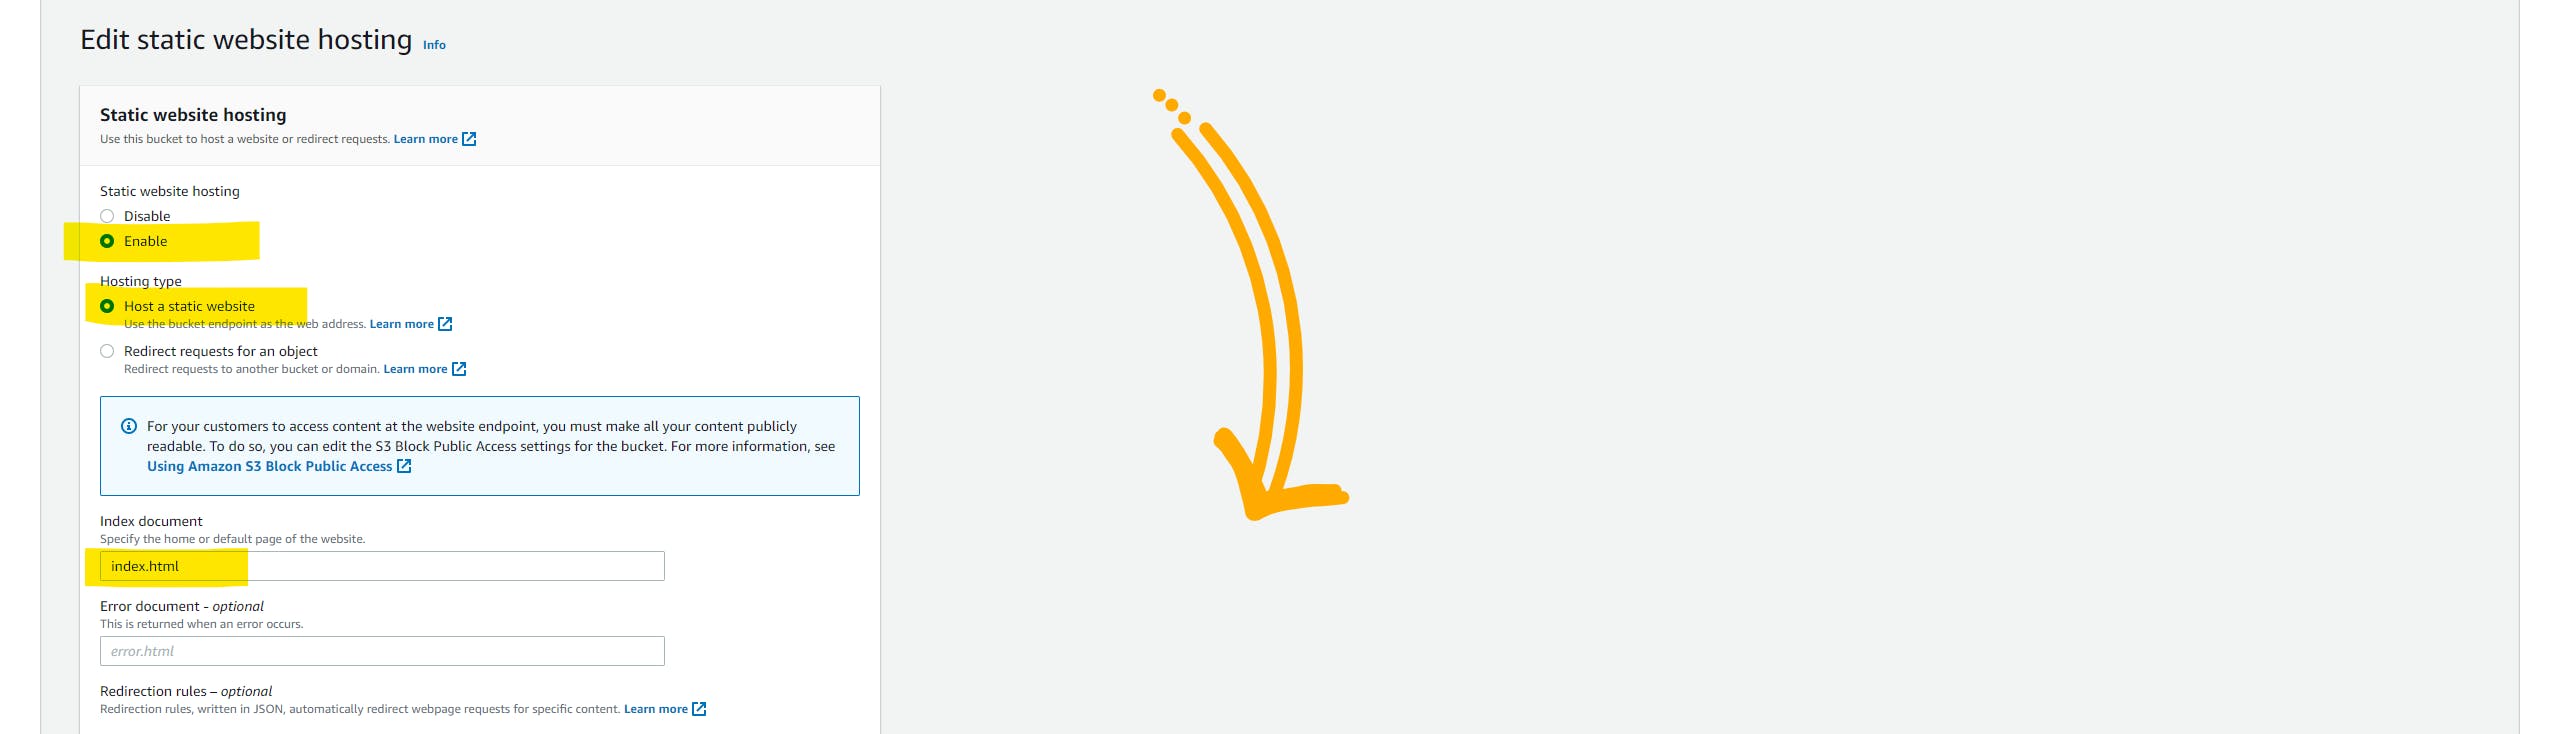
Scroll down til the bottom of the page and here we can see one configuration with the name static website hosting. we need to enable that. So click on the edit button.

In the static website hosting settings, select 'Enable'. Then, choose 'Host a static website' as the hosting type. Provide the name of your default page in the index document text box (e.g., index.html). If you have an error page, you can specify its name in the error document text box (e.g., 404.html). Finally, click on the 'Save' button below to save the settings.
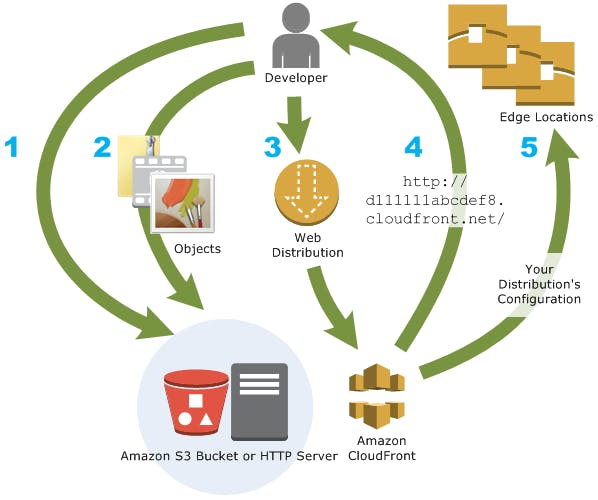
Now, you will see the endpoint to access the website. but you won't be able to see the website if you paste that in browse because to do that you need to give proper permission. but we are not going to touch any permission this will be done by CloudFront.

and that's it, we did the setup for one region now it's time to set up the same thing in the secondary region. all steps are exactly the same just you need to give another name to the bucket. because each bucket name must be unique across all AWS accounts in all the AWS Regions. so please complete the setup for the secondary region.
after setup, I've two buckets.

Now, let's utilize the ⚡ Power of CloudFront.
head to the CloudFront dashboard. click on the distribution and click on the Create distribution button in the top left corner.

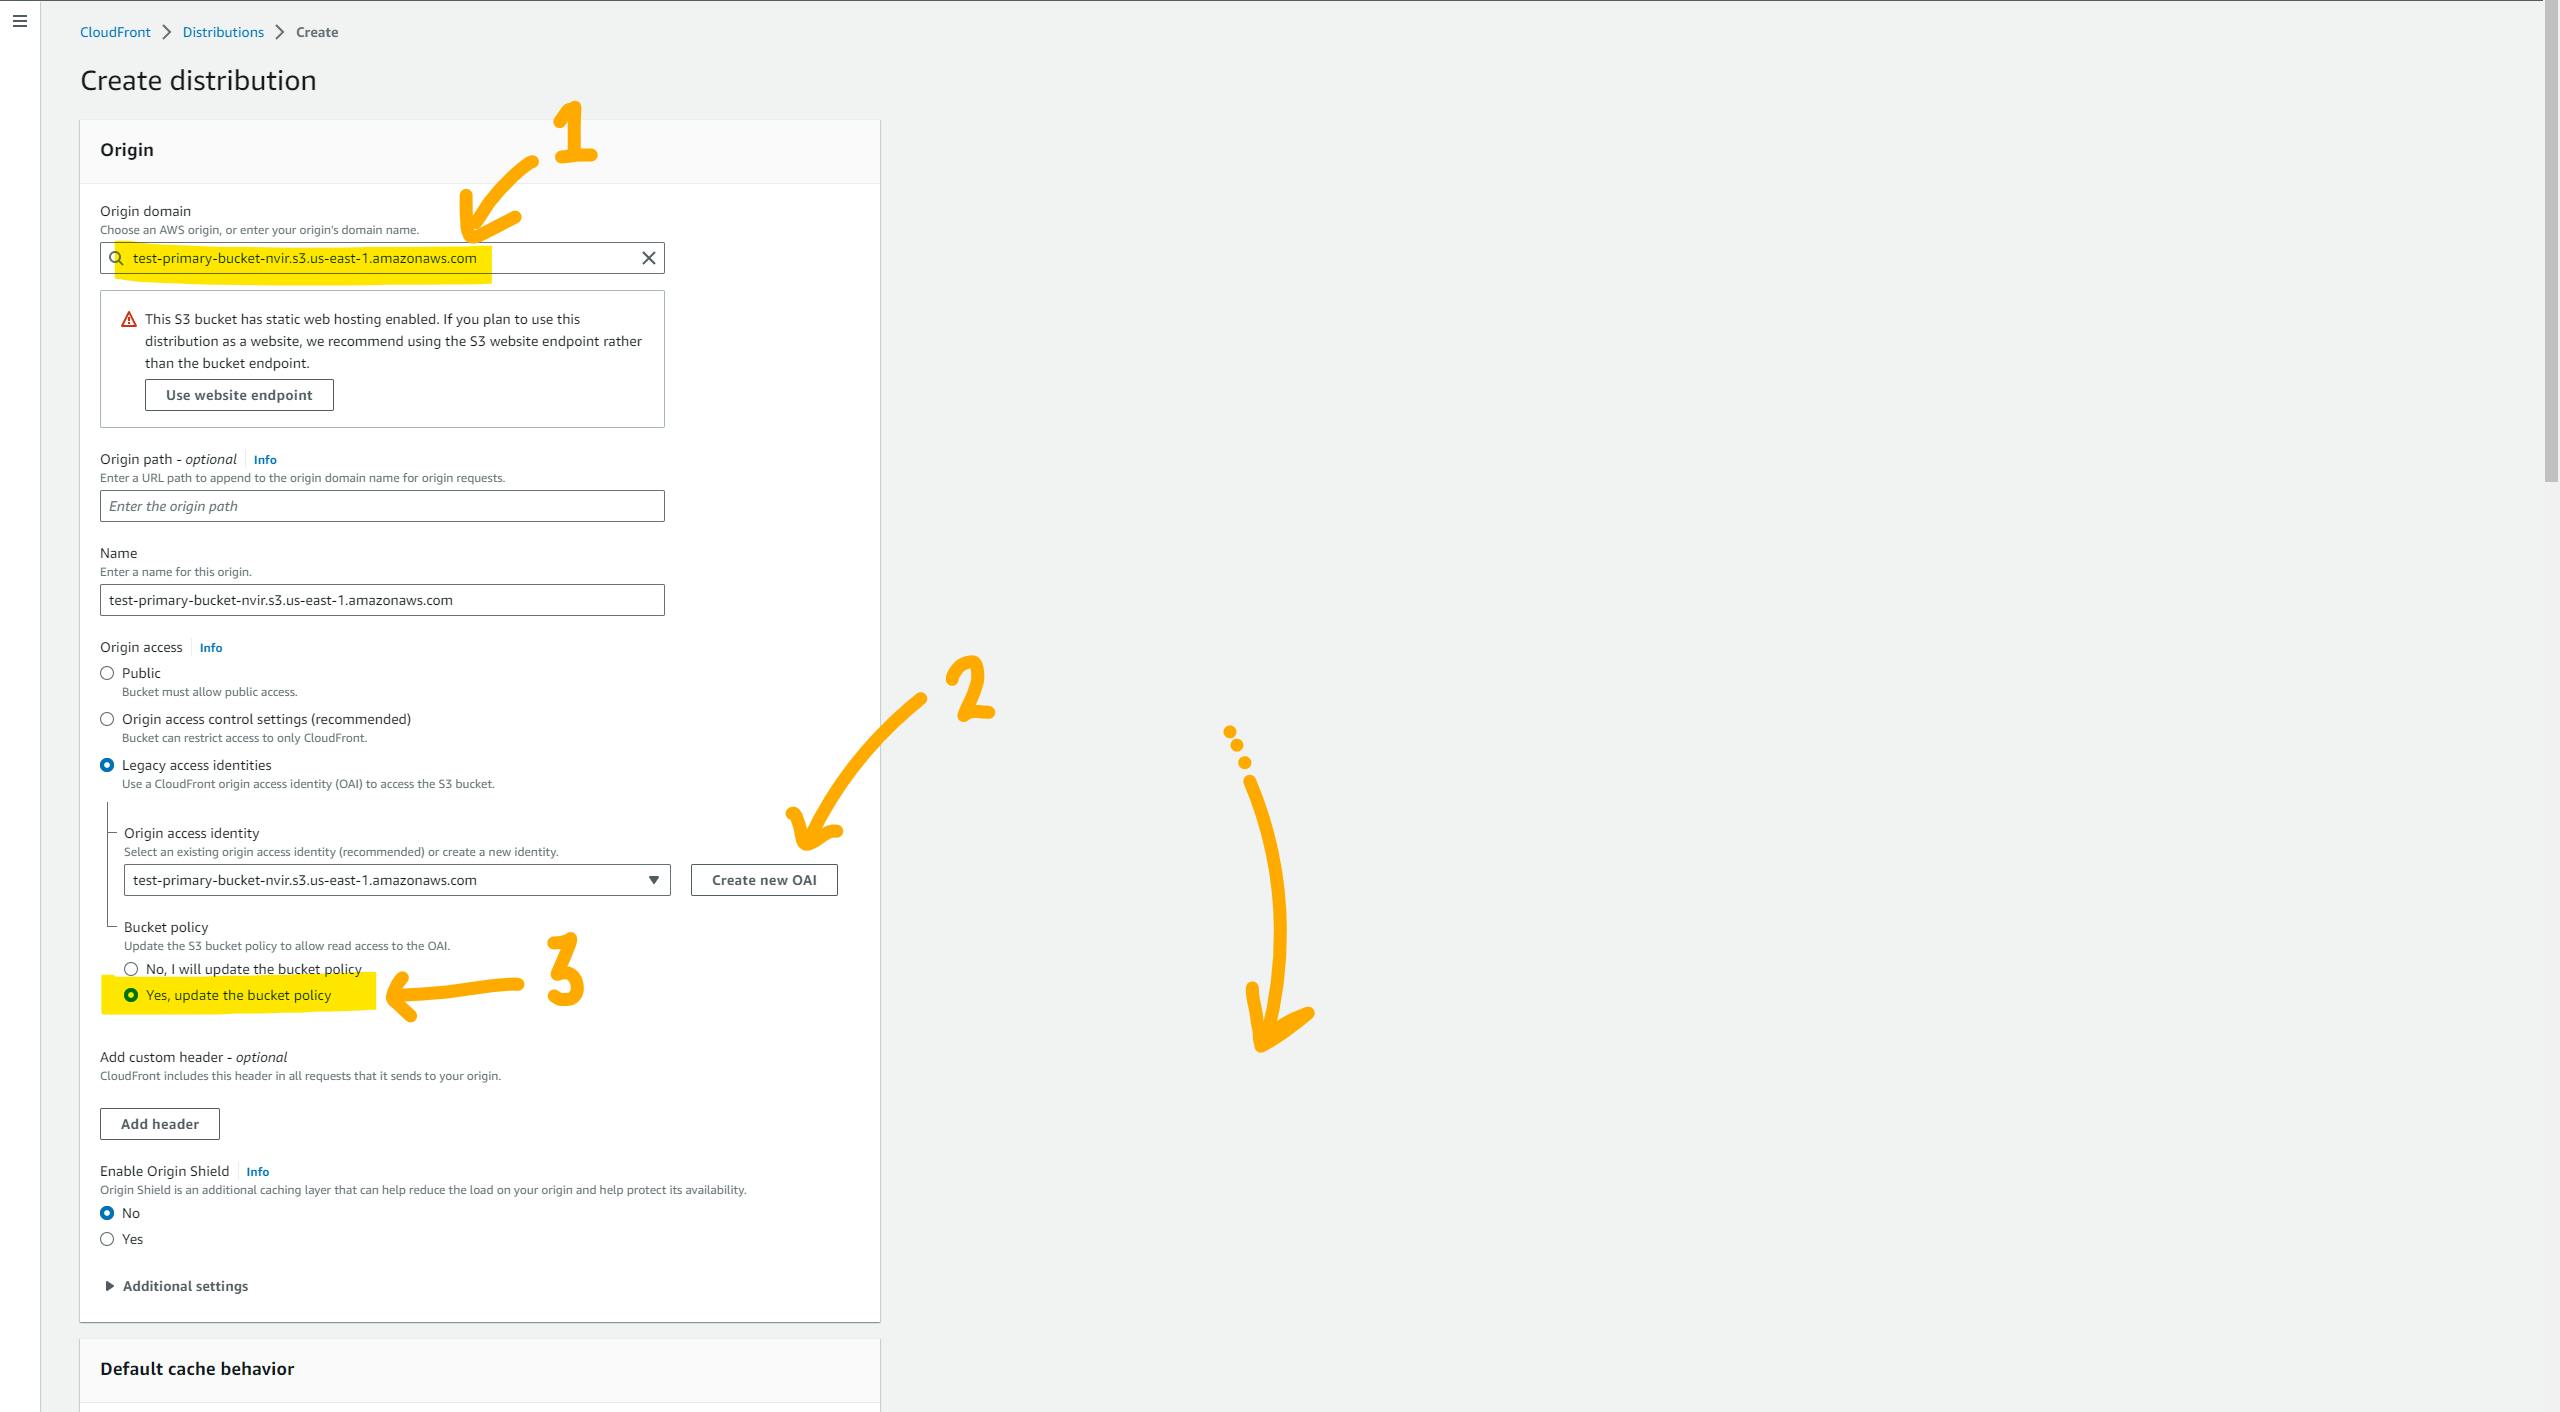
To configure the CloudFront distribution, select your bucket (Primary) name from the drop-down list. In the Origin Access section, choose 'Legacy access identities' and click on the 'Create new OAI' button next to the drop-down menu. This will create a policy that allows CloudFront to access the S3 bucket and its content. Ensure that you select the 'Yes' radio button in the bucket policy configuration. By doing so, the newly created policy will be automatically inserted into the S3 bucket, eliminating the need for manual configuration. Scroll down to proceed ⬇️
Caching policy is very important for the performance of the website, Actually, it's all the way different topic. but to keep things easy AWS gives some predefined policies that you can utilize instead of writing your own. the policy should be written based on the number of times Cache Hit and Cache Miss.
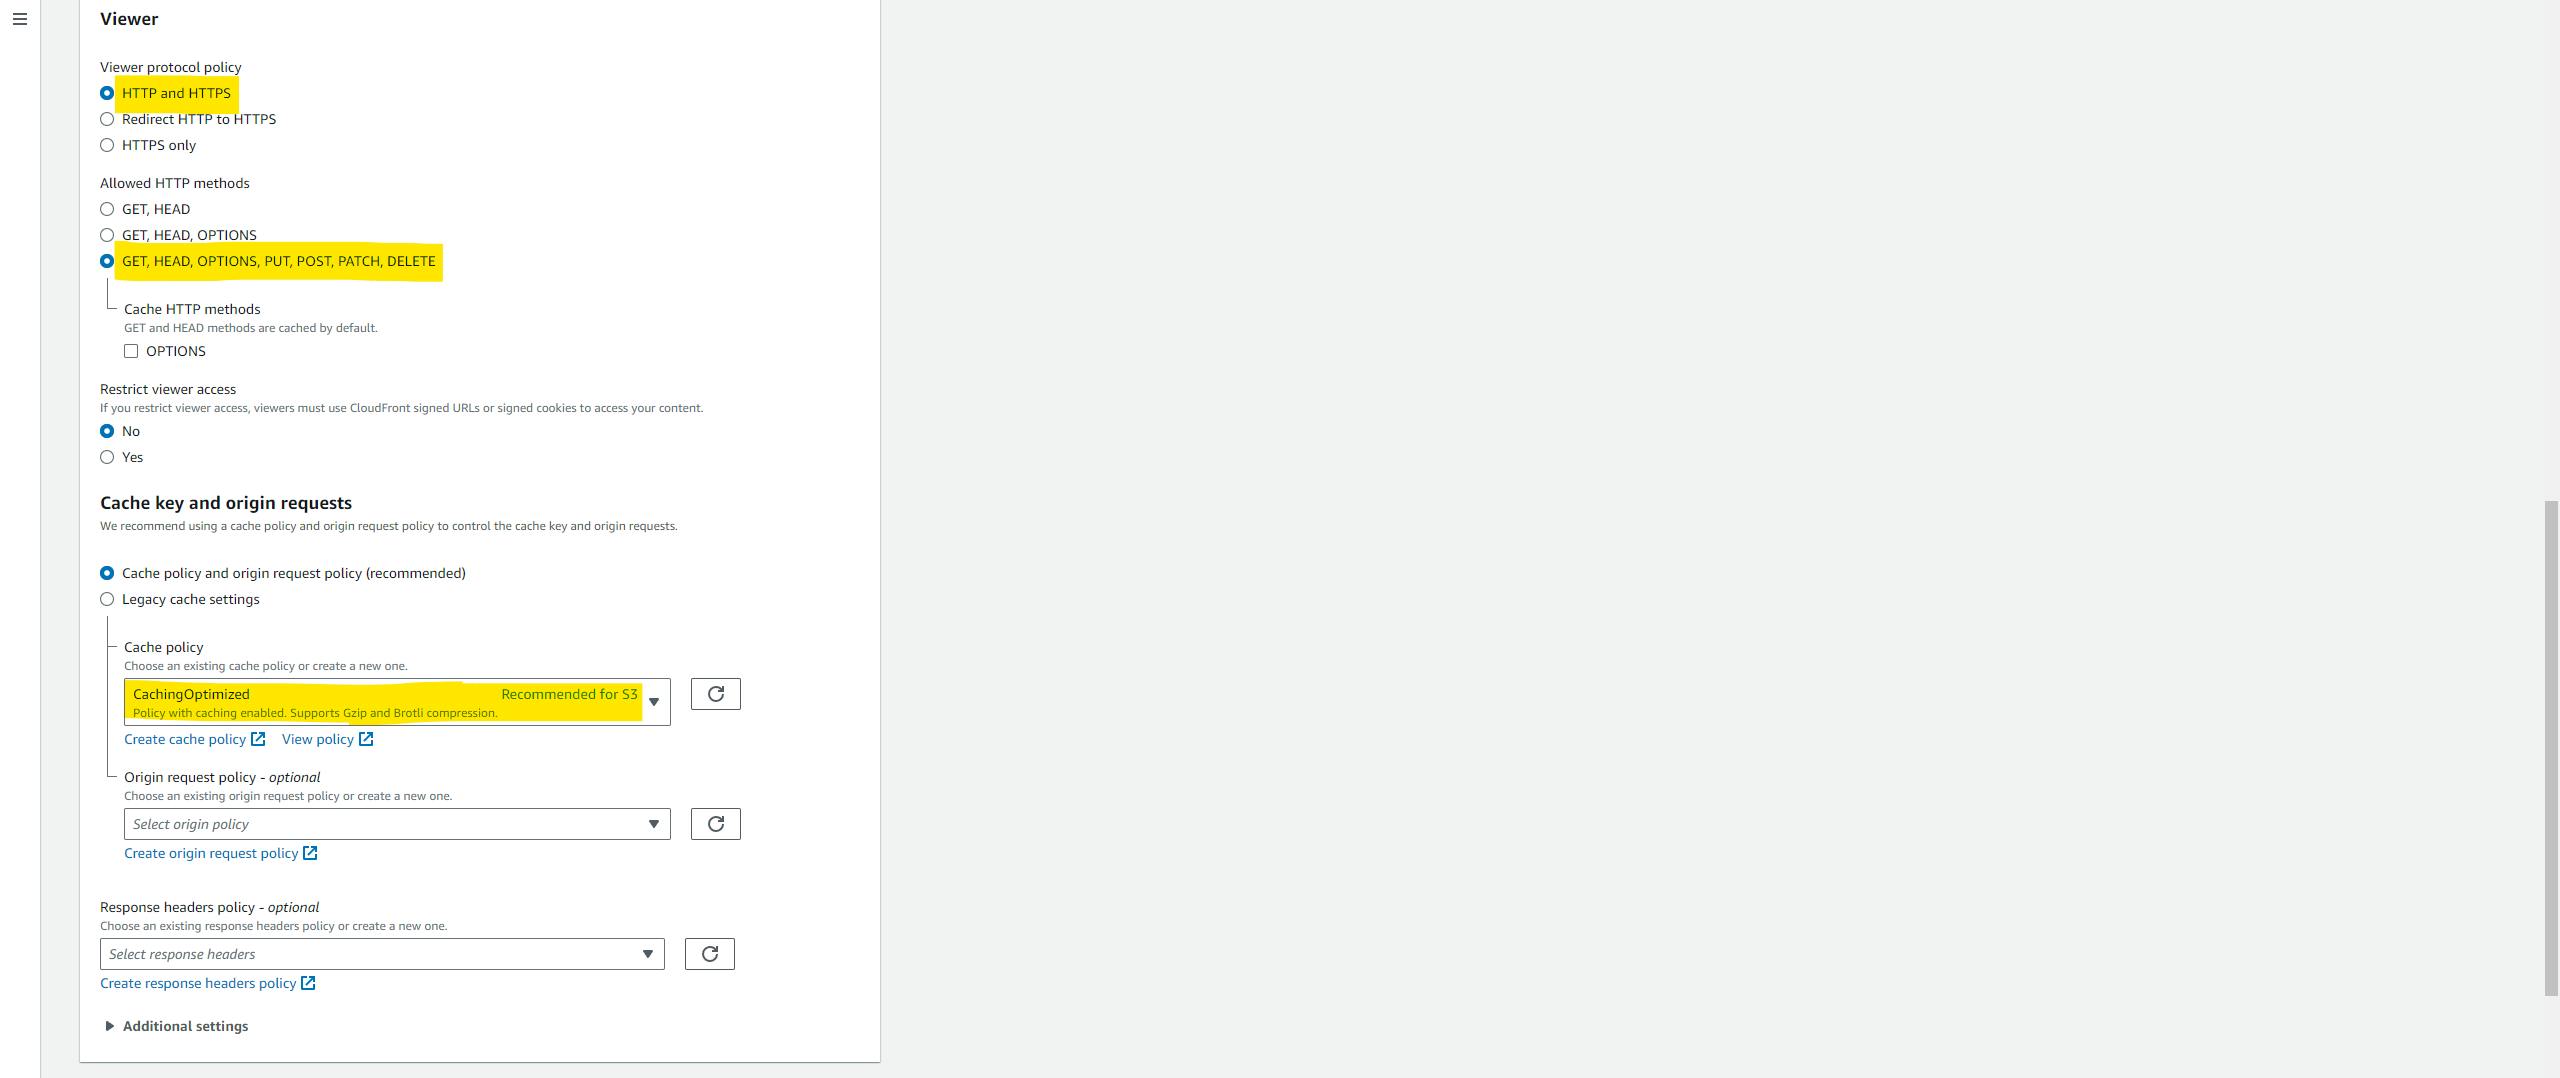
You can configure the rest of the settings depending on the resources you have like a custom SSL certificate or AWS WAF etc. but here I'm just showing you a demo so currently I'm ignoring those stuff. but in a real-time scenario, we can't ignore security.
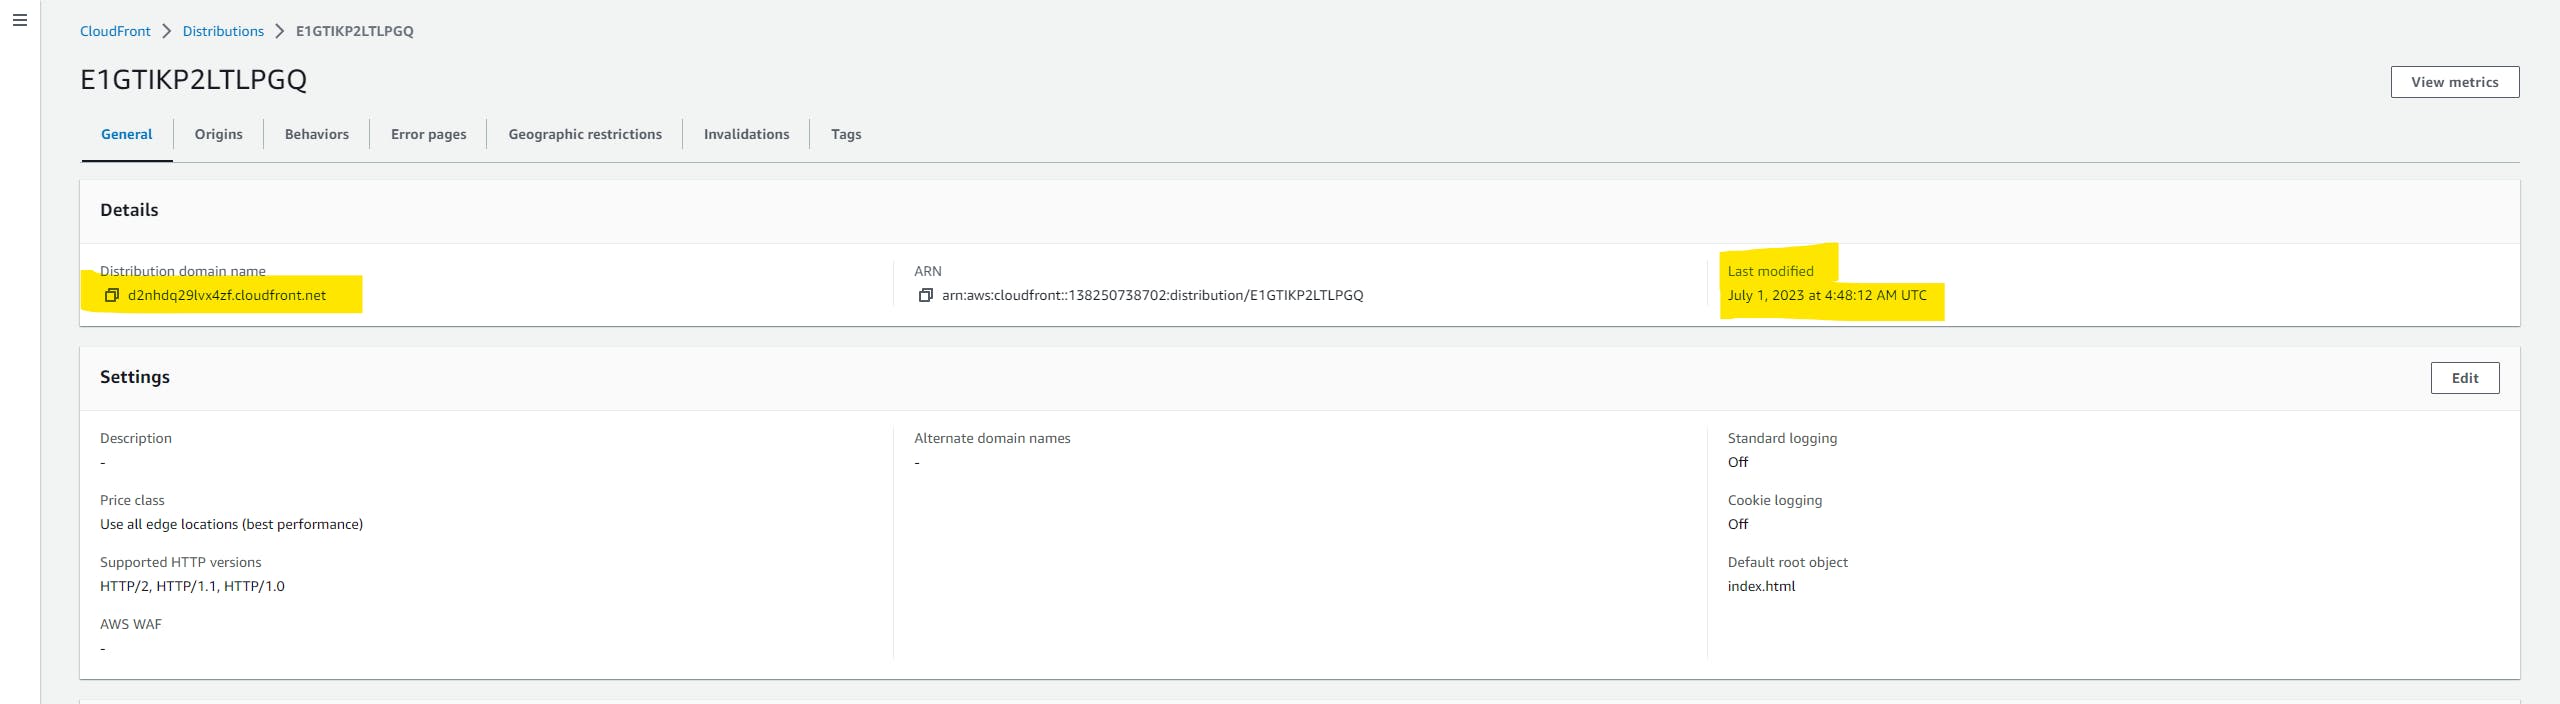
write the name of the default object in the default root object. (e.g. index.html) and lastly, click on the Create Distribution button.

CloudFront takes a few minutes to cache our website all over the world. so please wait for a few minutes. you will get a DNS name from CloudFront to access your website.
let's test it. paste the endpoint in the browser.
currently, our CloudFront pointing to a bucket that is in N.virginia but we need to attach one origin or bucket that is in Oregon so that we can perform failover in case of disaster or region failure.
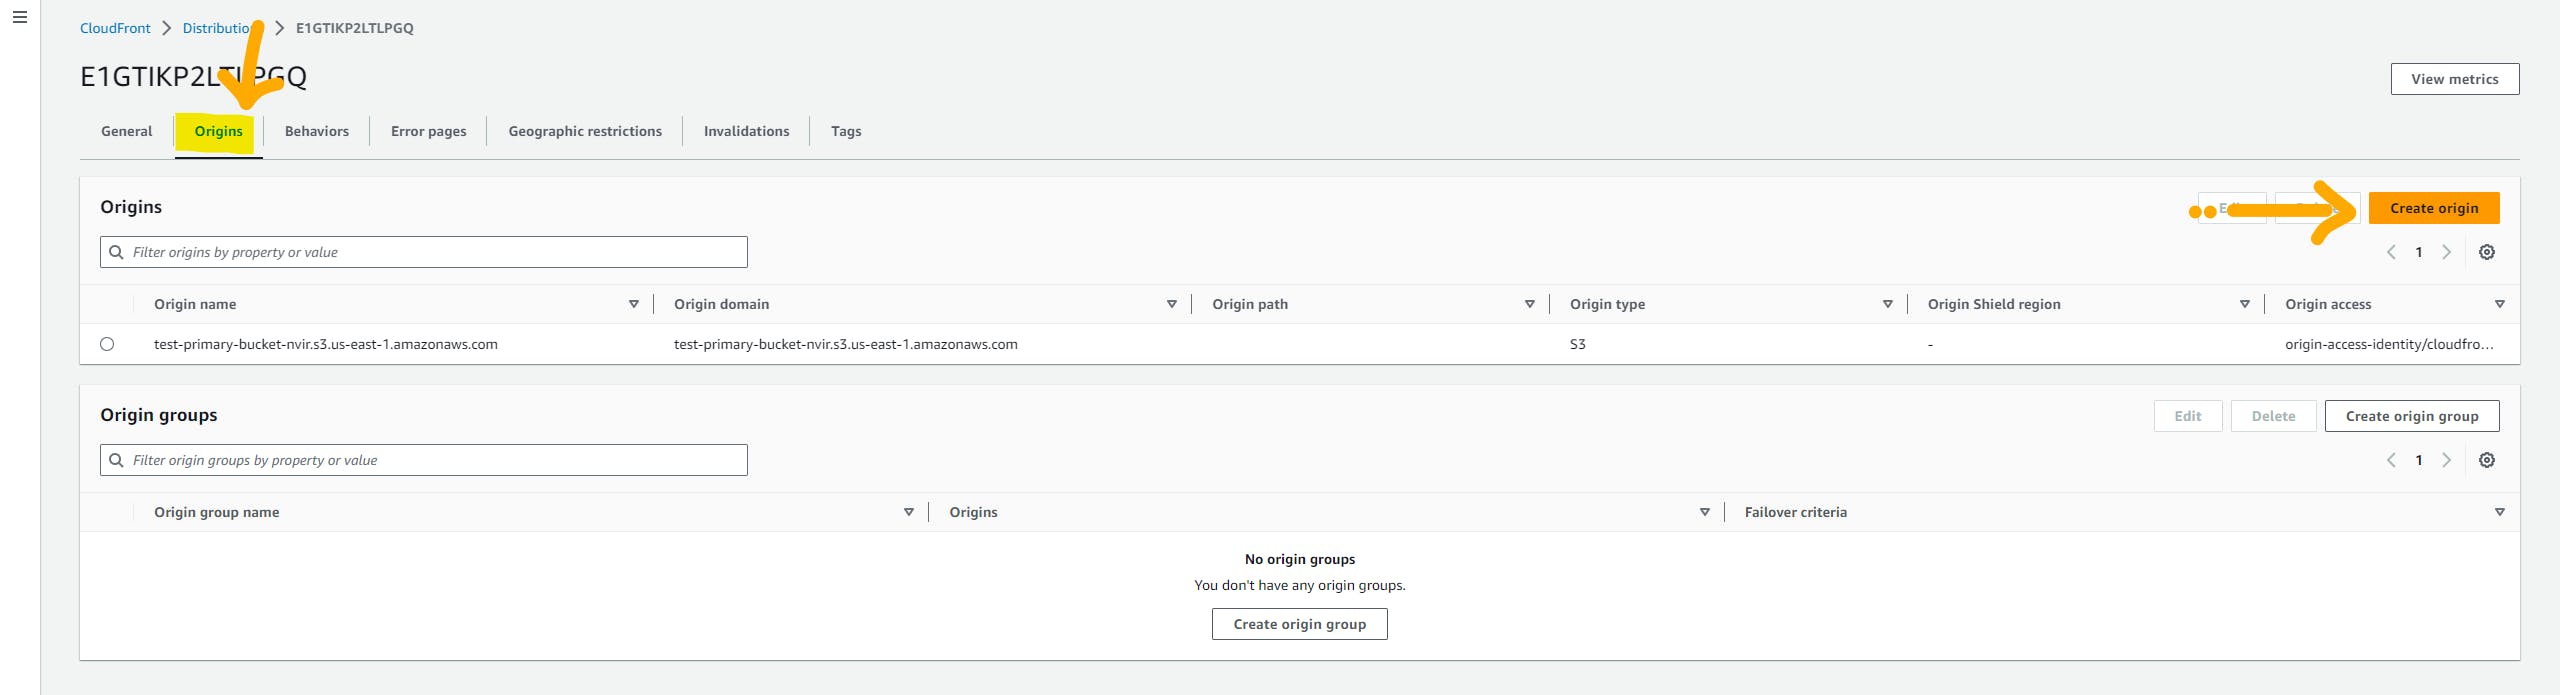
click on the 'Origin' tab and click on the 'Create Origin' button.
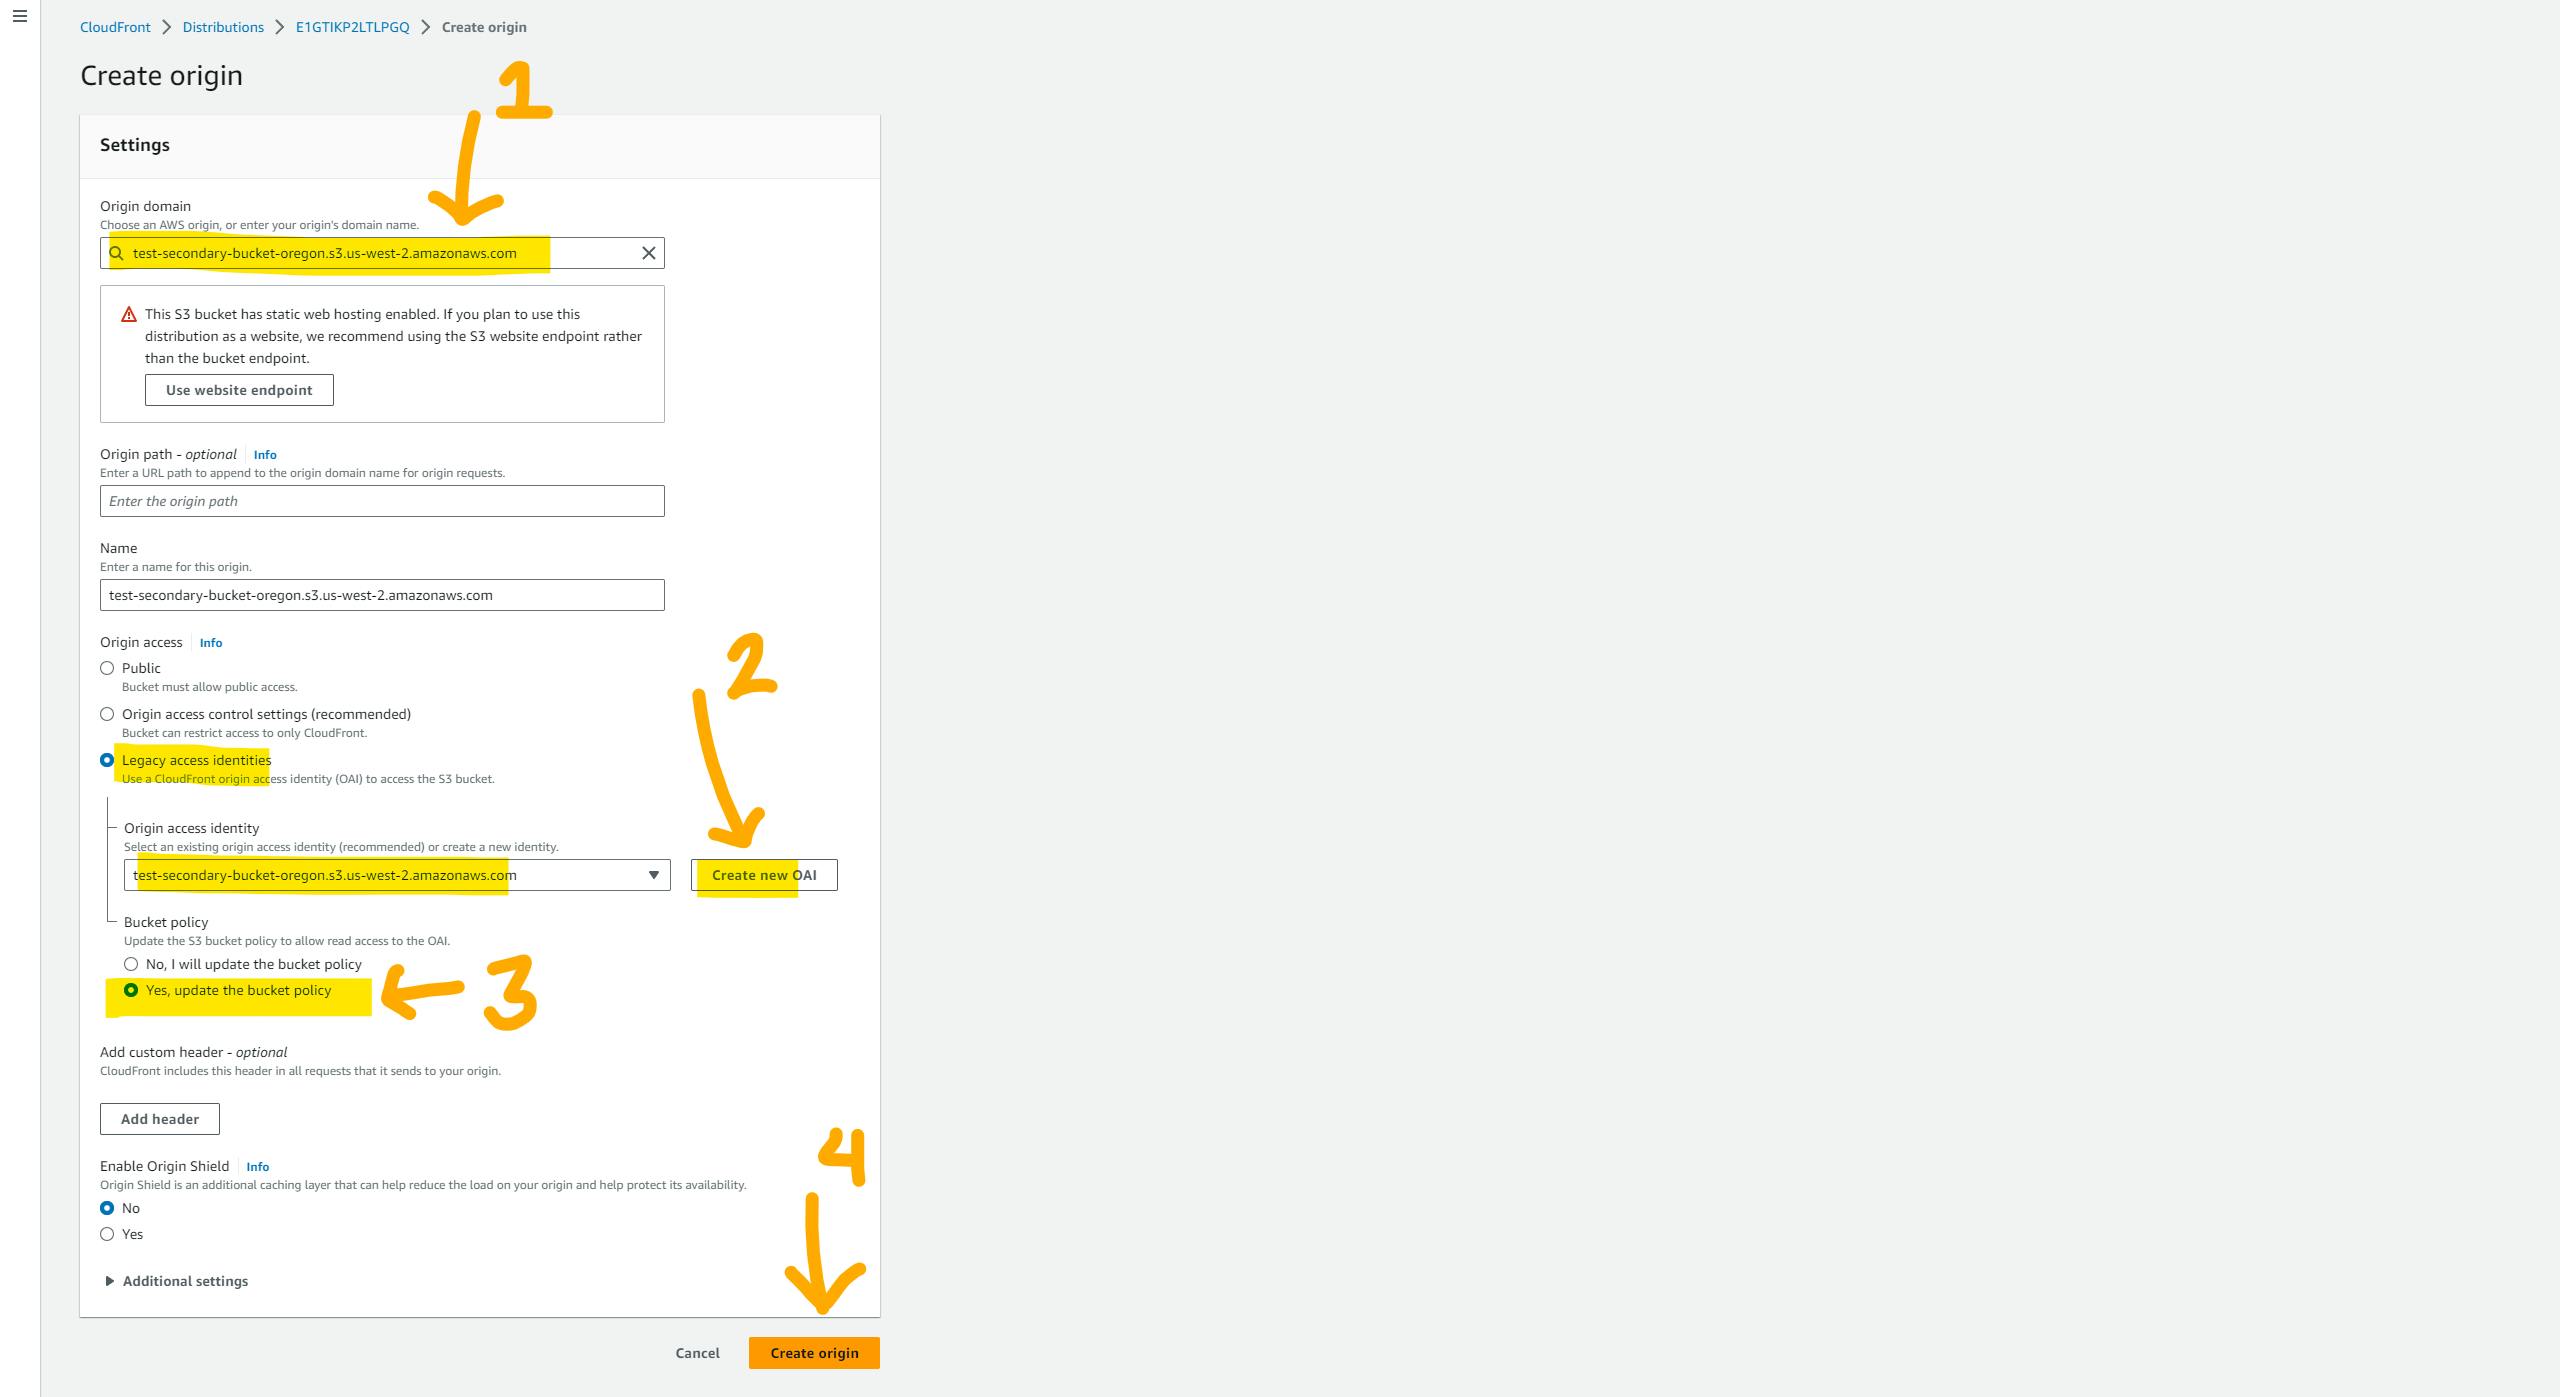
Here can configure CF for another origin, and select a secondary bucket from the drop-down list. and all the steps are similar to what we did before. so lastly click on the 'Create origin' button.
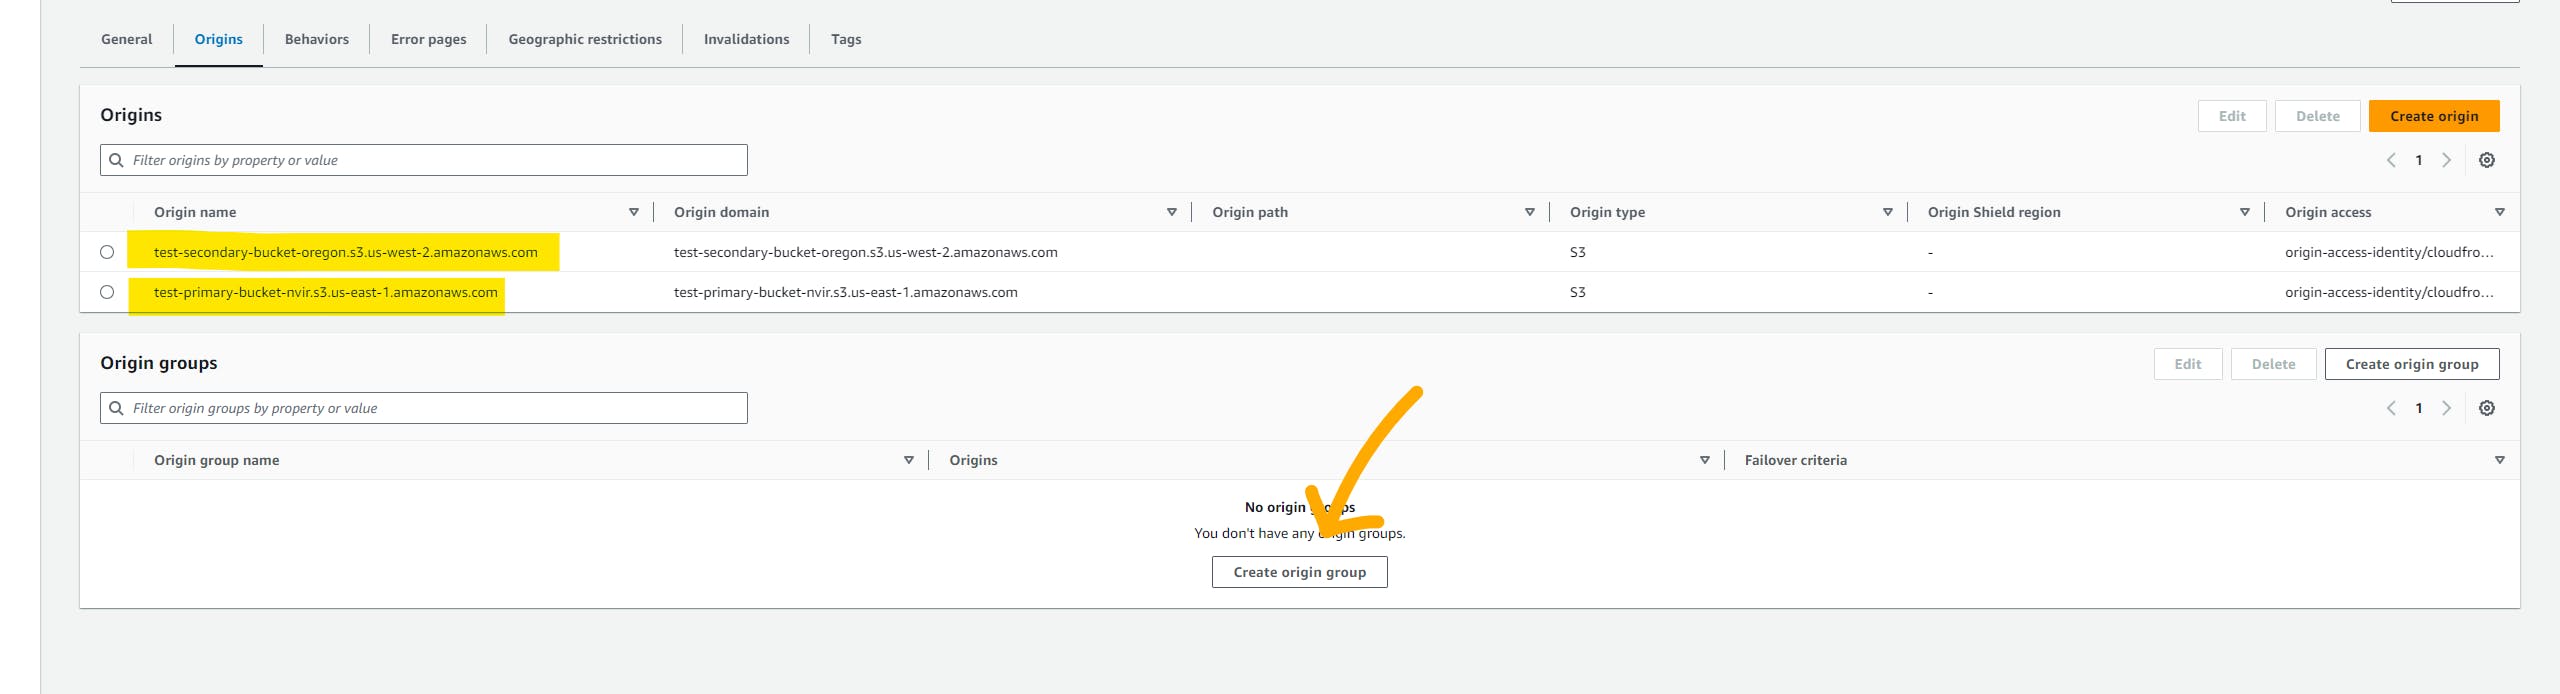
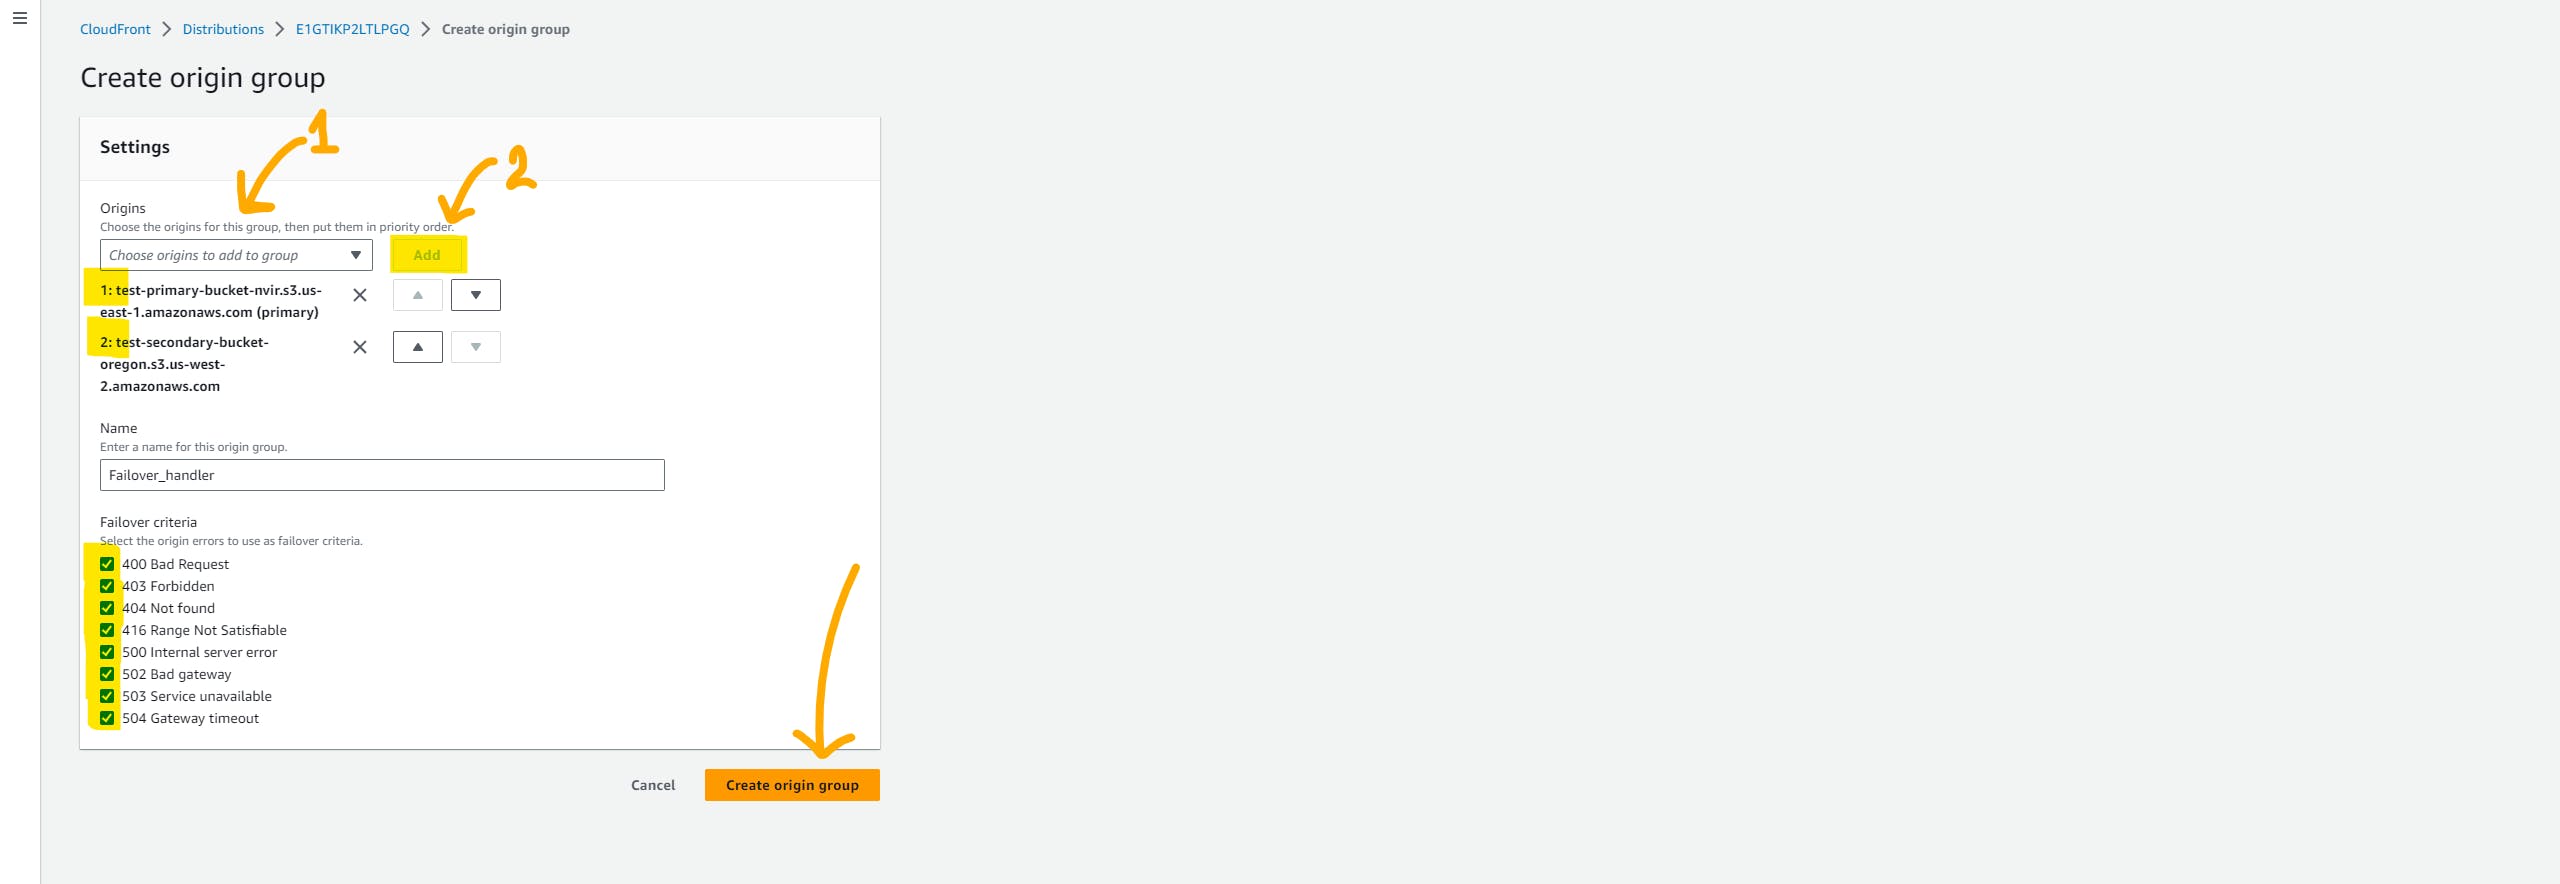
Now we have two origins, let's create an origin group. click on create origin group button.
Select the primary bucket from the drop-down list and click on the 'Add' button. Now, select the secondary bucket and click on the 'Add' button. Here, you can specify which bucket's content should be sent to the user. Please provide the name of the group. Select all the failover criteria for CloudFront. If CloudFront receives any of the specified status codes, it will initiate failover. but we have to manually do the invalidation. you can use lambda for invalidation.
Lastly, we need to change the behavior configuration. click on the 'behavior' tab. select and click on the edit button

here we just have to change the Origin and Origin group. so select the Origin group that we have just created from the drop-down list. and click on the save button below.

please wait for a few minutes till CloudFront do the distribution. now take the DNS name and paste it into the browser.
Conclusion :
That's it! You have successfully set up CloudFront to deliver your website content. It may take some time for the CloudFront distribution to propagate globally, so keep that in mind when testing the website's performance.